

Performing what is known as the “Big 3” upgrade to your vehicle will improve the performance of your electrical system and increase its current handling capabilities. This should be the first upgrade done to your electrical system which will then allow you add more powerful audio system components. Factory wiring is thin and insufficient for running anything but basic audio systems. Larger diameter wires will be added to the existing factory wire (or swapped out entirely), usually 1/0 gauge wire to get the best current flow and least resistance. This new decrease in resistance will reduce light dimming, reduce voltage drops, stabilize voltage and current flow, and decrease the strain being put on your vehicle’s electrical charging system. Additionally, you can then add batteries, capacitors and more alternators onto your system.
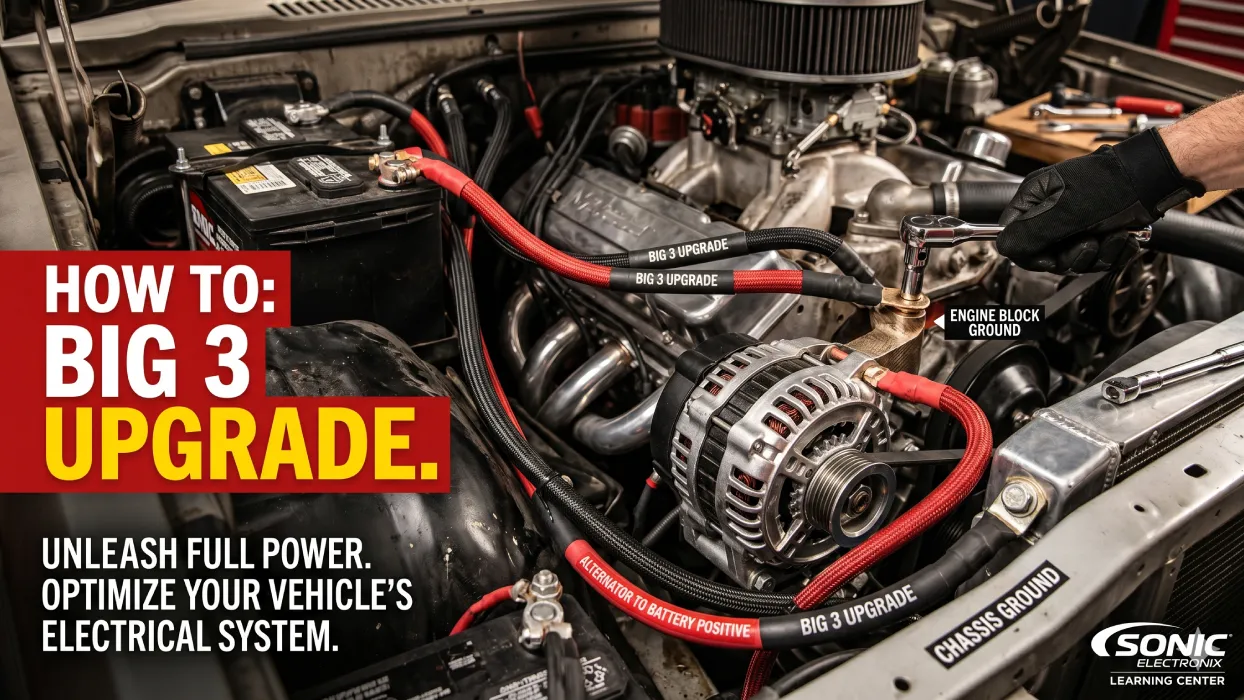
The Big 3 Upgrade is a Swap or Addition to These Three Cables:
- Alternator positive cable that runs to the positive terminal of the battery
- Negative battery cable that runs from the battery to the vehicles chassis
- Chassis grounding cable that runs to the engine block
When to Perform the Big 3 Upgrade
This upgrade should be performed on any vehicle before adding a High Output Alternator. Additionally, any vehicle with an after-market amplified stereo system will benefit from this upgrade. This should be the first upgrade you make before adding additional batteries, capacitors, or alternators, especially if you need slightly more current before other upgrades.
What Will I Need to Perform This Upgrade?
We have “Big 3 Upgrade Kits” that come with everything you need to perform this modification on your vehicle except for standard or exotic tools. However, here is a basic list of what you might need to perform the upgrade:
- High Capacity Power Cable Long Enough for Vehicle (Most Common is 4 AWG)
- 5/8” or Smaller Heat Shrink Tubing
- Ring Terminals/Lugs that Fit the Cable
- Two Terminals that Fit Battery Posts or Terminals
- Wire Cutters of Sufficient Size
- Plastic Cable Ties (Zip Ties)
- Solder and Soldering Iron
- Crimpers of Sufficient Size
- Wire Strippers of Sufficient Size
- Heat Gun
- Standard Tools (Wrenches, Screwdrivers, Etc)
How Do I Perform This Upgrade?
Your vehicle should be parked in a safe location away from the elements and the engine should be completely cool before starting work.
1. Get Your Cables Ready
Most Big 3 upgrades use 1/0 AWG cable, but you need to make sure whatever cable you use can meet the current demands of your system. If you don’t know the length of cable you need, measure, ask your local dealership or overestimate. You must use 4 AWG or greater high strand count cable and never solid core wire. Measure the lengths of the factory cables used and cut your new wire slightly longer than those lengths, usually 1 to 1-1/2 inches longer. A vehicle in motion is subjected to vibrations and bending which could disconnect these cables. Most upgrades keep the factory wire in place as an extra line of defense against mishaps.
2. Choose Wiring Path & Cap Cables
Choose your path to run the wire. Keep in mind that the cable should stay away from fans, belts, moving parts or surfaces that heat up such as exhaust outlets and the engine block. Cap each end of your three new cables. You need to insert the wire into the wire lug and use enough solder to melt into the strands of cable without melting the cable itself. Use heat shrink tubing to seal and weather proof the ends of your new wire connectors.
3. Disconnect Electrical Equipment
Disconnect the negative cable on your battery and then disconnect the positive cable in that order. Be mindful of any capacitors and additional batteries you may have in the system. Discharge and capacitors or disconnect any other batteries to create a safe working environment. Check out our article titled, “How to Discharge a Capacitor” if you need help.
4. Connect Your Cables
It does not matter what cables you start with, we prefer starting with the battery negative. If your stock ground is sufficient, just run your wire alongside the original factory wiring and bolt up to the ground. Most of the time however, you will need to drill a new hole into the chassis, scrape off all paint around the new grounding location, clean the surface thoroughly, and make your connection. You want bright shining metal to connect to.
Now go after the alternator to battery positive wire. Locate the alternator and find the positive post that connects to the battery. It might run to a fuse block or it could go straight to the battery, be careful. Disconnect the stock wire, add the new wire to it, and bolt it back on. No need to get rid of the factory wiring unless you want or need too.
Lastly, it’s time to tackle the grounding cable that runs from the chassis to the engine block. This is the most important cable in the Big 3 because the alternator, which grounds through the engine to the chassis, is your “Absolute Ground”. Disconnect the wire at both ends and clean the contact surfaces with a wire brush and cleaner. Run your new cable alongside the old one and either use the factory chassis ground or drill a hole and make a new ground. The other end of the cable will connect back to the bolt located on the engine block.
5. Secure the Wiring
Now take cable zip ties every 6 inches or so and secure your new wire to anything that will remain cool and does not move.
6. Check Your Work
If everything is connected snugly, and correctly, you can now connect your battery positive cable first and then your battery negative cable back up and enjoy the new electrical freedom you have. Turn your vehicle on and check for any vibrating wires or connections and secure them when the engine is off and the battery ground is disconnected. If your charging system survived the upgrade, it should read 13.8 to 14.4 Volts when the engine is on.
We highly recommend you take a Digital Multi-Meter and measure the resistance of your newly installed cables before connecting the negative battery cable. Your ground from the battery to the engine block, and the positive terminal on the alternator to the disconnected positive cable on the battery should measure less than one ohm.
Once you’re done, go to our Facebook page or Forums and show us pictures of your Big 3 Upgrade!
NOTE: This article is a generalization and some vehicles may require different methods, tools, or material to perform a Big 3 Upgrade. Always consult your local installer or mechanic before beginning this installation.
About The Authors
Staff Writer
Staff writers at Sonic Electronix are experts in their field. In addition to a complete in-house training program, these experts typically have many years of hands-on experience in their specialty. Some come from car audio installer backgrounds, while others come with extensive retail experience.


