


No matter what type of car you drive, no vehicle is complete without a sound system that uses a powerful subwoofer. While brand new, subs can hit some pretty low frequencies without missing a beat, they tend to lose their effect as they age. As time goes, wear and tear takes a huge toll on the overall performance of your subs. The louder and more often you pump up that bass and volume, the closer you are to pushing your subwoofer to the limits.
One of the most vital parts of a subwoofer that is very susceptible to fatigue is the cone. Constant use and abuse of your sub could cause splits and cracks to develop in the cone surround. Once this occurs, the subwoofer can’t really move air as designed. If you continue using your fatigued subwoofer, this will only contribute to placing more stress on the weak points and enlargement of the splits. External objects could also cause physical damage by piercing the cone and eventually rendering the subwoofer useless. Fortunately, there are plenty of other remedies for a damaged cone. The most recommended solution would be to take your tired, blown speaker to the audio doctor for a little tune up. But if you prefer a cheaper, and more hands-on approach, here’s a guide to recone your subwoofer:
Reconing
All types of damage to the subwoofer (except magnet, frame and enclosure damage), can be fixed through a simple process called reconing. This process basically involves removing and replacing all the moving parts of a subwoofer such as the cone and surround, spider, lead wires, voice coil among others. There are plenty of ways to recone a subwoofer. The first method entails buying complete recone kits that range widely in price. Alternatively, you could take the more involved way that requires you to strip your subwoofer. Depending on factors like budget, experience and time, you can go with whichever method suits you best. Here is a detailed DIY guide for reconing your fatigued subwoofer.
What You’ll Need
Before dismantling your sound system, round up the following tools to help smooth things along:
- Invest in a soldering iron and fresh solder
- Drill with a Phillips bit
- Stanley Knife or blade
- Bottle of Acetone
- Bottle of aircraft paint stripper gel
- Rubberized CA glue
- Allen wrench
Stripping the Subwoofer
Pop the trunk or panels where your sub is installed and unhook the subwoofer’s connection to the battery. Next use your Phillips screwdriver to remove the woofer from the enclosure and set it up on a working table. You will also want to get rid of as much dirt, junk and debris as possible so that the next step goes as smoothly as possible. Spray some acetone on a cleaning cloth and rub down your spider landings as well as the surround unit to get a clear view and diagnosis.
Recone the Sub
After a thorough cleaning of the entire subwoofer, it’s time to recone it. First off, you will need to cut off and remove the old cone, spider, and coils using your blade. The basket and frame need to be cleaned thoroughly with the acetone and then roughed up with sandpaper to remove traces of old glue. The cleaner the parts are, the easier it is for new bonds to be made with the spider. Next, place your spacers in the former and slide it through for a snug fit. Make sure not to damage anything or dent the delicate former. Since the spider goes first, make sure you glue it to the basket firmly and then position the voice coil.
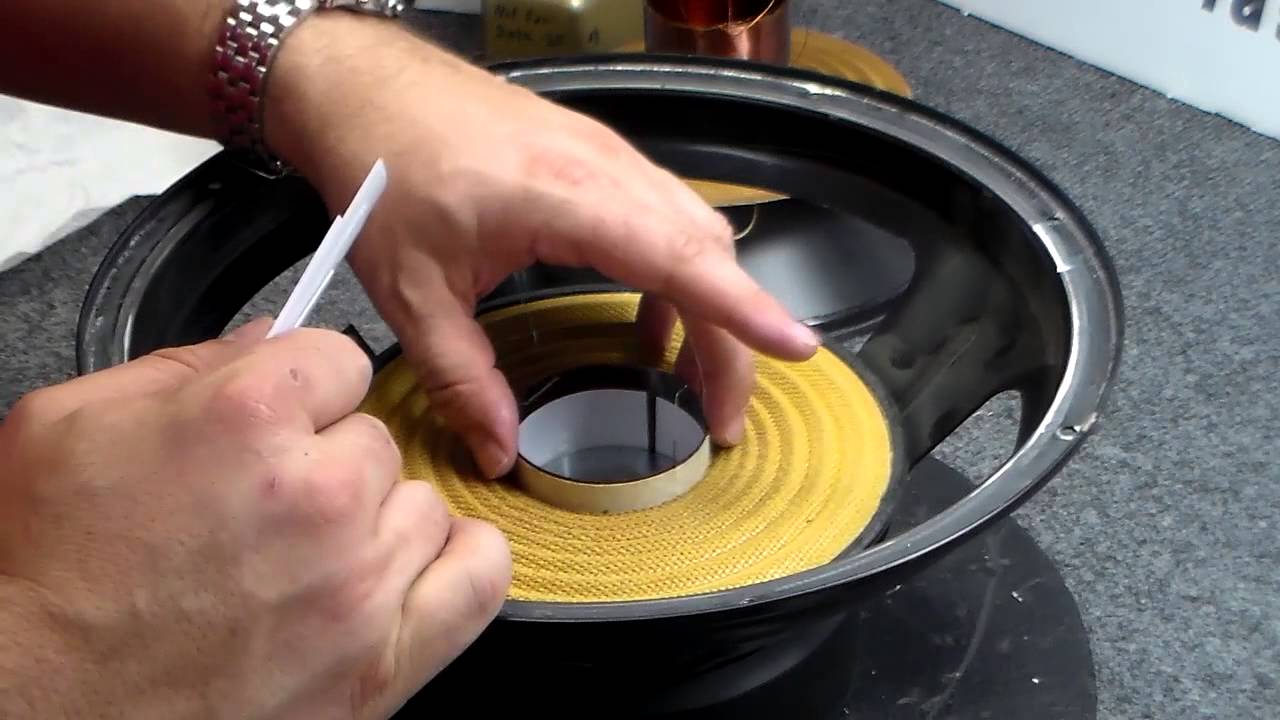
Next, you need to desolder old tinsels and solder on the new tinsel leads with your soldering iron and bulb. Leaving the gap spacers in place, it’s time to put the cone that should be seated flush and snug against the upper lip of the basket. Apply adhesive to the edge of the basket and stick the surround on top. To ensure a great, airtight bond, sit a couple of books that will push down the surrounds evenly. After allowing for time to dry, the subwoofer should sound as good as new. Reinstall the subwoofers into the enclosures and back into your car to test out the sound.
Conclusion
Before you replace your entire sound system, make sure you consider reconing and repairing your equipment. You might just save a pretty penny. And remember, a properly reconed speaker is exactly the functional equivalent of a brand new sub. If you prefer not to get your hands dirty, just take your unit to a professional to get the job done right.
About The Authors
Michael Namm
Born in a subwoofer box, music has always been my passion. At the proud age of 9 I began driving. The two eventually met and led to my career at Sonic Electronix.


